Showing posts with label Garden security. Show all posts

Tuesday, 8 February 2011

Building a shed base for our new Addition Bike Storage Unit – On a budget (Part2)

Now we have decided on where to put my shed, I can continue with the base.

Stage 3: Digging out. 
Ok I’m happy with where my base will go – next I need to dig the area out with a spade.  
I have dug a square of just over 2.1 m x 1 m at around 450mm deep.  The ground is soft and the roots where no problem.   
Roughly mark out area and dig out.
Stage 4: Putting my frame into place.  
This bit requires a little patience and skill as itt is vital these batons are all level.  Starting at the Left hand side I simply knock this side down until it is level (using a spirit level to check).  Next, I put the Right Hand side in place checking it is level with the LH side using the spirit level again.  Finally the front and back batons are in place and the whole frame is levelled all round.   

TOP TIP: As this unit will be in a corner, I have put a slight slope to from the back of the base to the front.  This will allow any excessive rain to run forwards rather than getting trapped behind the unit against the wall. 

Stage 5:  The foundation.
Using old brickwork saves money
 
 As you can see by the image above I have used old bricks left over from a recent house extension.  This waste becomes my hardcore for pouring concrete over (hardcore is around £40 – £60 per ton). 

Note: I have placed the bigger bricks at the front of the base, this will help me to get the front edge nice and level (ensuring the doors open freely)  I have also used a nice big brick in the middle to help take any weight.   I can use this method on the bike store unit as I know there won’t be too much weight placed in it.  If I had chosen one of the bigger units such as the Gladiator a better/deeper base would be needed.   I also know this bike unit will not be bolted down or a ground anchor used, so I’m not worried about anybody drilling into the base.  The purpose of this cheap DIY base is only to keep the unit level and off the lawn.

Time to spend some money:  My 1st cost is a £1.00 bag of shingle from the garden centre.  I scatter this between the larger bricks – I find it just helps to bind everything together when I pour the cement in later. 

Stage 6:  Time for some real work! Mixing the concrete.
 Now I need to mix my concrete and ballast to form the flat base.  Because we have used nice big bricks in the base preparation we need less than half of what we would have needed doing this the “correct” way.  
A mini mixer will make life easier.
I have cheated and used a mini mixer (to save my back!).  Such a small amount of concrete would be easy to mix by hand – but using a mixer really does reduce the amount of effort. 
To mix the base I used:
6 bags of Ballast £1.20 each
1 bag of cement. – £3.65.   

Stage 7:  Cement/Ballast.
When mixed simply pour over the base, between the batons.  I have made my mixture a little on the sloppy side – this helps it flow into the gaps around the large bricks and bind with the shingle.  I push the mixture into the gaps with my trowel. 

Stage 8:  Get it level.     

This bit is nice and easy. 
Assuming your edge batons were nice and level simple tap and drag another piece of the pallet along the side batons until the base is level with the top of the batons.  Easy!  
 
Stage 9: Almost Finished. 

Allow the base to dry for around 24 hours. Note:  I know this unit will not be bolted to the ground, so I took no notice of the position of the large bricks.  If you are bolting down – I would suggest you put the large bricks in the corners of the base or make the base to the recommended min depth as per the main Asgard website.  Giving you plenty of hard material  to drill into. 

Stage 10: Tidy Up.

I knock away the batons to reveal a nice clean edge to the concrete.  You can now make it look a bit nicer.  We have chosen to fill up to the base with soil then scatter decorative bark around the base to prevent weeds growing (and reduce on going maintenance work), and reseed the area immediatly around the unit to repair the lawn.  

Equipment used: Mini mixer (optional – but recommended) – Spirit level -  Spade – Small trowel – Tape measure  Materials used:  1 wooden pallet – Ballast (6 bags) – Cement  (1 bag) – Pea shingle  (1 bag) – Water (for cement)   
Total construction time 1 hour – dry time 24hrs
Total cost: £12.85 – Optional mini mixer £20 weekend hire
Once I build the unit I will post a picture of the finished base with the bike shed in situ.  This will be in Part 3

Asgard Secure Steel Storage take no responsibility for the content of this blog.  This information is intended as  a guide only.  It is the responsibility of the reader to check all the facts before undertaking any works.   If in doubt you must contact a registered and qualified builder for information.

For information about our full range of bike storage sheds and cycle storage units see our main website www.asgardsss.co.uk and click on bike storage.  

Building a shed base for our new Addition Bike Storage Unit – On a budget (Part1)

In these tough economic times we are all looking to save money where we can.  So, we asked a local DIY enthusiast (and ex-builder) to talk us through how to put a simple base down for an Addition Bike Storage Unit.  However, to make things a little harder we set him a budget. 
 
The task was simple:  Build a shed base in my garden suitable for an Addition bike storage unit for less that £50.   We thought that this couldn’t be done... how wrong we were.
 
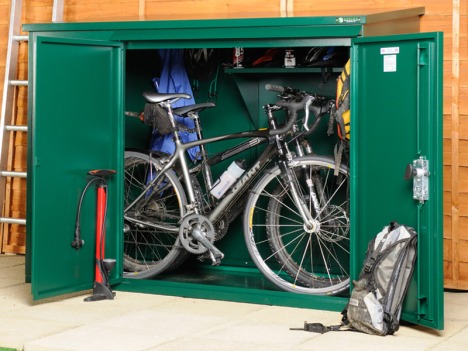
Addition bikestore
Addition Bike Shed - store your hybrid bicycle in here!

The Addition bike store is the original bike storage solution from Asgard which has been described by Bike Radar Magazine as “The best bike storage they we have seen” .  Designed to house up to 3 bikes, the Addition  unit is built from tough galvanised (weatherproof steel) and features a heavy duty 3 point locking system.
The Addtion secure bike storage unit is quite a heavy unit for it’s size - Heavy enough to be a deterrent to thieves but not so heavy you require an industrial grade base to sit it on.

Stage 1: Where to put it? 
The Addition bike store measures 1800mm x 800mm – So I will be looking for a space around 2 meters x 1 meter for the actual unit, then a further 2 meters in front of the unit to allow easy access..  An area has been allocated already – this is not an ideal area, there are a number of tree roots and lumps of rock in the way.   The area is also close to over hanging trees which may need cutting back. 

Where to put your Asgard bike store
Decide where to put your Asgard bike store
Asgard recommend you leave a couple of meters between your unit and any walls, this stops and thieves from using a wall as leverage to try and move the units.  Leaving space around the unit will also help to keep condensation down as air flows through the hidden vents in the roof.  As this unit is tight against the wall there is no change is can be used as a lever. 

Stage 2: Mark out the area.   
'Measure twice cut once' has always been my moto.  So, I have marked out roughly where the shed base will be using wooden batons.  As you can see, we may just get away with not cutting back the trees in this case.
Batons mark the spot
TOP TIP:  Making a cheaper frame.
Delivery palettes come in lots of standard sizes, I have found one that happens to be 2.1m x 1m.  There are hundreds of these things all over the place and normally free (if you ask nicely).  So I asked a local  store if I could have one and simply knocked the palette apart with a hammer.
I now have a ready made, perfect size frame – no cutting  and most importantly no trip to B&Q on a bank holiday weekend!

 More in part 2 – Coming soon.

Wednesday, 15 December 2010

I have put my Metal Bike shed together, but I want to move it without a rebuild!

If your shed isn’t too big and heavy (small sheds such as the Addition Bike Storage units), moving it is reasonably easy assuming the ground is reasonably flat. You could even manage to do this on your own but its always nice to have some help - and as they say - two heads are better then one!

Step by step instructions for moving a Metal Shed installed in your garden.

You will need: 2 pieces of Plywood – wider than the unit by around 100mm (6mm thickness Plywood will be fine).

 1: Gently, lift the far end (the direction you want to go) and slide the plywood under the shed by a couple of inches.
 2: Go back to the other end and push – The unit will simply slide over the plywood (almost) effortlessly – push the unit until just short of the end of this 1st piece of plywood, then stop.
3: Place the next piece of plywood next to this then continue to push the unit. The unit should slide over onto the next piece of Plywood – Repeat as many times as necessary.

The unit will slide along the ground with minimal effort. In the case of the bigger units we would recommend you at least part dismantle the unit before attempting such a move and not to tackle the big units on your own.

And there you have it.  If you are attempting this, I think it goes without saying to make sure the unit is empty and there is nothing stored inside it.  Also, make sure your concrete base at the new location is prepared and ready for the unit.
Related Posts Plugin for WordPress, Blogger...